
The Expansive World of Filters
By Bokeh Rentals | July 9th, 2021What is a Lens Filter:
A lens filter is a camera accessory that cinematographers use to control the image. On the surface, a filter is a protective glass that can slide in and out of the matte box in order to eliminate the possibility of extra dust, dirt, scratches, and obstructions that could damage the lens. Apart from their rudimentary use, filters are an excellent way to have more leverage in manipulating the image. Certain filters can enhance colors by adding or subtracting hues and intensifying or dulling the saturation of particular colors. This in turn adds contrast to the image and creates a more vibrant picture. The most used filters are those that affect the exposure of the image by limiting the amount of light that is allowed to pass through the shutter. These filters have varying degrees of how much light they block, and ultimately protect the cinematographer from overexposing the image. There are also filters that can be used as visual special effects by creating a type of obstacle illusion in front of the sensor like Schneider’s True-Streak filters.
What is Schneider’s True-Streak Filter:
Just like any filter, the true-streak filter is placed in front of the lens in order to manipulate the image. Once placed in the matte box, the true-streak filter essentially exaggerates or mimics an anamorphic flare. When light passes through the filter, a hued streak cuts through the light’s source. Based on the source’s size, scope, and intensity, the flare can vary in size. The brighter the light source and specular reflections, the more intense the streak will be. Because anamorphic lenses have a unique internal glass structure, when light passes through the lens it reflects, refracts, and essentially “bounces around” before it reaches the camera’s sensor. Once the light reaches the sensor, a horizontal flare will result based on the angle in which the sensor is receiving the light. These filters work best when using point light sources to create fullest visual effect.
 Size, Intensity, and Color:
While blue is the most common solid color, there are other colors that streak filters come in. Schneider produces colors in Orange, Green, Yellow, Violet, Pink, Gold, and Clear. There are also rainbow streak filters, which merge all the color streak filters into one glass. This special effect seamlessly creates a rainbow gradient streak wherever the light source is. Opposed to the true-streak rainbow filter, the true-streak confetti filter creates small multi-colored streaks around a light source. This filter creates firework-like bursts that streak through and around the source.
Size, Intensity, and Color:
While blue is the most common solid color, there are other colors that streak filters come in. Schneider produces colors in Orange, Green, Yellow, Violet, Pink, Gold, and Clear. There are also rainbow streak filters, which merge all the color streak filters into one glass. This special effect seamlessly creates a rainbow gradient streak wherever the light source is. Opposed to the true-streak rainbow filter, the true-streak confetti filter creates small multi-colored streaks around a light source. This filter creates firework-like bursts that streak through and around the source.
 Based on how far apart the colored lines are from each other on the physical filter, determines the intensity of the streak. The closer together the lines are will great the strongest streak. In other words, the 1mm true-streak filter is more intense than the 4mm filter. At Bokeh, we offer the True-Blue Streak in 1mm, 2mm, and 3mm.
 Using True-Streak Filters:
These filters can either be inserted to a conventional 4x5.60 matte box tray or be gear-driven in order to quickly rotate the streak to a desired angle. Like mentioned before these filters can enhance anamorphic lenses that already naturally create streaks and flares simply due to the mechanics of the physical lens. But what if you are shooting with non-anamorphic lenses and desire the streaks to fit the look of your project? These true-streak filters in front of your lens will imitate the anamorphic optics and help achieve your look in a cost-effective way. These filters also enhance highlights and helps to draw attention to a specific part of the frame.
Using True-Streak Filters:
These filters can either be inserted to a conventional 4x5.60 matte box tray or be gear-driven in order to quickly rotate the streak to a desired angle. Like mentioned before these filters can enhance anamorphic lenses that already naturally create streaks and flares simply due to the mechanics of the physical lens. But what if you are shooting with non-anamorphic lenses and desire the streaks to fit the look of your project? These true-streak filters in front of your lens will imitate the anamorphic optics and help achieve your look in a cost-effective way. These filters also enhance highlights and helps to draw attention to a specific part of the frame.

Bayer Sensor Technology
By Bokeh Rentals | July 9th, 2021Bayer Sensor Technology
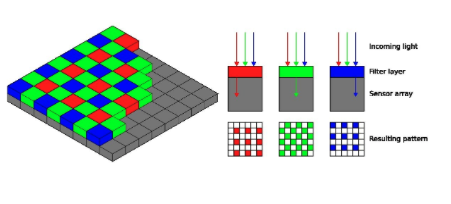
One of the greatest things that could happen to digital cinema is if color or wavelength of light could be recorded directly. Sensors would gain two to three stops of dynamic range, around 40% more detail, and much more accurate color rendition. Sadly, photo-sites are colorblind; they only record amount of light, not type of light. Therefore, camera systems have had to use some workarounds, each with their own complex engineering and flaws, to record color. Film stocks used layers of dyes, and early digital camera systems used prisms to separate wavelengths of light. Now, we are working in the era of the CFA, or color filter array. This is a filter applied over the top of the sensor with a specific pattern of red, green, and blue filters to separate light hitting each photosite.
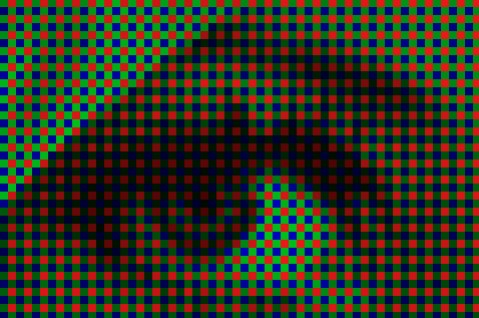
The Bayer filter array is the most commonly used CFA. The pattern is shown in the image below: each green photosite is surrounded by two red and two blue photosites in alternating red-green and green-blue rows. The sensor is divided into 50% green, 25% red, and 25% blue photosites. Each photo-site is sensitive to only one color, and in the majority of camera systems, each photo-site corresponds to one pixel in the final image.
This confused me for a long time. How do we get the millions of colors we see in films? It seems that to get one accurate color pixel in the final image, you would need one green, one red, and one blue photosite on the sensor. It turns out that cameras are a lot smarter than that. Complex algorithms work to determine a pixel’s color based on the amplitudes of the pixels around it, and it does this millions of times for each frame. This process is called demosaicing, through which the color of each pixel is interpolated by those around it. This math accounts for a lot of the differences between different camera systems and the images they produce.
Part of the reason Bayer sensors work is because our eyes are much more sensitive to changes in brightness than to changes in color. Therefore, even though color detail is reduced by the CFA, it does not ruin the image’s apparent resolution. Look at the image above: what immediately catches your eye is the contrast between the near-white fire and the shadows in the forest and water: changes in exposure, not in color.
The reason there are twice as many green pixels as red and blue is because human eyes are most sensitive to green light, and thus exposure is primarily dependent on our perception of green wavelengths.
The downside to this way of determining color is it loses a lot of light. A lot. About 1/3…” of incoming light is rejected by the sensor’s CFA.
Another problem is the detail of the image is severely reduced by the filter array. Even if the demosaicing algorithm is extremely precise, there is still guessing involved, which will blur the final image and cause artifacts. This can be solved by shooting at a higher resolution than the deliverable format, and scaling down in post-production.

Digital Anamorphic – What is it?
By Bokeh Rentals | July 9th, 2021ANAMORPHIC
The word anamorphic is derived from the latin anamorphosis, ana- meaning back, or again, and morphe meaning shape or form. Put together, it means transformation. Anamorphic refers to the class of imagery that requires the viewer to use certain tools or occupy a specific vantage point to view the undistorted image. This technique of imaging was invented by Renaissance painters. The above image is one example, a painting which requires a cylindrical mirror to be viewed. The bottom right image of Andrea Pozzoa’s 1694 painting in the church of Sant'Ignazio, Rome, is actually a flat ceiling, with a perspective that requires the viewer to stand in the center of the chapel to view the undistorted image.
Anamorphic lenses use these foundational principles of purposefully distorting an image for the image to then be returned to its undistorted state for viewing through a projector analogue or by pixel transformation digital. The original purpose of this was to capture a wider horizontal field of view than the width of the medium allows. The sketches below illustrate the ability of anamorphic imaging to capture a horizontal field of view wider than the image medium through initial squeezing of the image onto the medium which will then be de-squeezed later. The first image shows how a spherical lens would render the scene. The second image is what an anamorphic lens would render: a squeezed, distorted image. The final result is the de-squeezed anamorphic image: twice as wide as the original. This is an example of 2x anamorphic, meaning that the anamorphic lens squeezes the light by a factor of two. There are other squeeze factors, such as 1.5x and 1.33x, but 2x is the most common.
Anamorphic lenses were originally developed by Henri Jacques Chretien to give WWI military tanks a 180-degree field of view. Anamorphic did not attain popular use in film until the dominance of television started affecting theater ticket sales. Film studios had to capitalize on the strengths of the theater experience: color, and scale. Anamorphic lenses aided in the latter. In 1952, Twentieth Century Fox bought the rights to anamorphic imaging, with the goal being to create a spectacle out of going to the movies. Viewing films had to be monumental experiences, compared to the little 4:3 television in the living room. Anamorphic lenses allowed filmmakers to squeeze a wide, epic image onto the 35mm film stocks available and then de-squeeze it later in projection. This process is illustrated below. The bottom image is how the scene looks on the film stock: horizontally compressed, or squeezed. The top image is the final product.
Why not just film a 4:3 image with frame lines, then crop it to be widescreen later? A widescreen images width would cover the 35mm film stock, but not its height. Therefore a huge part of the film stock is wasted, AKA, loss of resolution and detail. Anamorphic lenses are used to gain back that vertical resolution, resulting in a significantly better image. The two images below show how anamorphic lenses utilize the entire surface area available; about twice the resolution is gained from the use of an anamorphic lens when used on a 35mm film stock, and about 40% on Super 35mm.
DIGITAL ANAMORPHIC
Digital sensors are by and large wider than 35mm film, which decreases the utilitarian need for anamorphic imaging. Spherical lenses used with these sensors can produce very wide images without the need for too much cropping. Using anamorphic lenses on digital sensors produces very high aspect ratios, and there is a loss of horizontal resolution compared to spherical lenses. The left image below is an example of a standard spherical lens used to cover the entire sensor. The right image is the same framing achieved with an anamorphic lens: the left and right sides of the sensor are not used, dramatically reducing the horizontal resolution of the image.
From a technical standpoint of using anamorphic only to preserve resolution, it only makes sense to shoot anamorphic on digital sensors when the required aspect ratio is extremely wide, such as 3:1 or 4:1, so the maximum sensor area is used in comparison to shooting spherical and cropping later.
The main reasons to shoot anamorphic on digital cameras are for artistic purposes. Anamorphic lenses have characteristic bokeh, flares, and heightened separation between the subject and background.
The oval-shaped element in anamorphic lenses which squeezes the light causes the out-of-focus parts of the image, or bokeh, to have an ovular shape. This much-loved component of anamorphic imagery gives the frame a sense of cinematic magic. Below is an image from Phoebe Waller-Bridge’s Fleabag, shot on Alexa Mini with Cooke anamorphic. Notice the ovular out-of-focus highlights in the background and the dramatic separation between foreground and background elements.


Alexa Mini LF & Signature Primes
By Bokeh Rentals | July 9th, 2021ALEXA MINI LF & SIGNATURE PRIMES
In Spring of 2019, Arri announced their new camera which has changed the game in large format imaging. The Alexa Mini LF has the same size ALEV III sensor as the much larger Alexa LF (36 x 25mm, 4.4K) in a 5.7-pound compact body very similar in form to the revered Alexa Mini. Perfect both for controlled studio environments and rugged shooting, the Mini LF is just as versatile as the Alexa Mini. Arri’s gorgeous color science and remarkable dynamic range are now available in a large format accessible both to indie filmmakers and professional productions.
The current influx of large format cinema cameras has been followed by a plethora of lenses with image circles covering full frame. Arri’s own large-format signature primes are the perfect match for the Mini LF. Beautiful skin tone rendition, deep blacks, medium contrast and organic colors prepare the image for Arris famous color science in the Mini LF’s sensor. A fast aperture of T1.8, slight softening while maintaining resolution and smooth focus falloff make these lenses the ideal companion for cinematic full-frame shooting.
Read on to learn more about the Mini LF, from its sensor technology to recording formats, as well as its exceptional pairing with Arri’s signature primes.
ALEV III SENSOR
Arri has long been the captain of digital color science. It is widely agreed upon that film stock achieves the most beautiful colors possible in film; while contested, it is fair to say the Alexa line of cinema cameras is the closest digital has gotten to this ideal: rich, naturalistic color, pleasing noise, and great dynamic range. What goes on behind the scenes is a closely-held secret by Arri. Tests have shown that the Alexa cameras emulate the response of film to light, therefore achieving more pleasant and natural colors. It is common knowledge that Arri uses a dual-gain architecture, meaning that each photo-site outputs two 14-bit values covering different exposure ranges, thus increasing the camera’s overall dynamic range. The sensor photo-sites are also very large, increasing light sensitivity, decreasing the noise floor and increasing dynamic range. You can read more about the ALEV III sensor on Arri’s website.
HARDWARE
The Mini LF’s body has some major upgrades in comparison to the Alexa Mini. The slick new viewfinder, MVF-2, has eyepiece heating/defogging and real-time regulation of the image’s color accuracy. Stereo scratch mics are a huge help for syncing audio and music video work. The camera records to Codex Compact Drives, which supports its higher resolution recording.
RECORDING FORMATS
The Mini LF records a variety of Apple ProRes and ARRIRAW flavors. It’s notable that the 16:9 recording mode has an image circle of 36.35mm, which allows for the use of some Super 35mm lenses. Check out this chart from Arri as you plan your next shoot.
 SIGNATURE PRIMES: THE LOOK
Creamy, smooth mid-tones and shadows with deep blacks. Naturalistic focus drop-off. Organic color and skin tone rendition. Check out the Signature Primes reel here.
These lenses are truly modern, with gorgeous rendering of fine detail, no breathing, and a rear magnetic filter and net holder which allows for the look to be manipulated. These are a perfect choice for when you need clarity and detail but don’t want to get too clinical. The lenses have character, but nothing that will distract or cause the images to be inflexible down the line.
THE LPL SYSTEM
Both the Signature Primes and the Mini LF feature Arri’s new LPL (large positive locking) lens mount, which has a wide diameter and shorter flange depth than the standard PL mount. This allows for large format lenses to be more compact while featuring low T-stops and great bokeh. The Signature Primes feature Arri’s updated data transmission system, LDS-2, which allows for much higher data rates than the previous generation and is made exclusively for LPL. Learn more about the new LPL mount on Arri’s website.
We have both the Mini LF and the Signature Primes available at Bokeh, and are working on a test with this combination right now. Check back on our website in the coming weeks for an in-depth look at what makes this a great combination.
SIGNATURE PRIMES: THE LOOK
Creamy, smooth mid-tones and shadows with deep blacks. Naturalistic focus drop-off. Organic color and skin tone rendition. Check out the Signature Primes reel here.
These lenses are truly modern, with gorgeous rendering of fine detail, no breathing, and a rear magnetic filter and net holder which allows for the look to be manipulated. These are a perfect choice for when you need clarity and detail but don’t want to get too clinical. The lenses have character, but nothing that will distract or cause the images to be inflexible down the line.
THE LPL SYSTEM
Both the Signature Primes and the Mini LF feature Arri’s new LPL (large positive locking) lens mount, which has a wide diameter and shorter flange depth than the standard PL mount. This allows for large format lenses to be more compact while featuring low T-stops and great bokeh. The Signature Primes feature Arri’s updated data transmission system, LDS-2, which allows for much higher data rates than the previous generation and is made exclusively for LPL. Learn more about the new LPL mount on Arri’s website.
We have both the Mini LF and the Signature Primes available at Bokeh, and are working on a test with this combination right now. Check back on our website in the coming weeks for an in-depth look at what makes this a great combination.
Lighting 101
By Bokeh Rentals | July 9th, 2021The modern cinematographer lives in an incredible time of technical advancement. There are so many different ways to shoot a scene, the freedom can be daunting. What camera, with which lens, will impart this specific feeling upon the viewer? What quality of light will support the idea I’m trying to communicate in this moment? The questions are endless, and the answers are constantly becoming more varied, with new equipment and technology arriving on a daily basis allowing for greater creativity, expression, and efficiency. When asking some of the preliminary questions in pre-production, it’s easy to get lost in a maze of options and combinations of options.
I have heard DPs with storied careers say no matter how much I learn, I’m just getting started. For people early in their careers, hearing that can be intimidating. It can also be exciting. There is so much to learn in the technical and artistic craft of cinematography, and it is continuously evolving. If anything, the one limitation we face is near-unlimited options, which can be the enemy of creativity.
With this lighting series, I am going to try to provide a guide to the labyrinth of lighting equipment and their uses. Narrowing down lighting units to specific choices for different applications. This is research I’m doing for myself, and I hope it will be useful to both beginners and seasoned cinematographers. After covering the basic types of lighting, I will start focusing on techniques and scene breakdowns later on. The next few blogs will cover the four types of light that dominate the industry: tungsten, LED, HMI, and fluorescent.
One of the most important choices a DP has to make when planning a production is what lighting to use. Arguably, this is as important if not more fundamental to cinematography than camera and lens choice. In many ways, it’s not about what camera you shoot with, rather how you use it and what takes place in front of the camera in the scene. Having technical and artistic understanding of lighting will have a much greater impact on the overall quality of a film than upgrading to the most expensive camera and glass the budget will allow for.
Learning types of light, what different lights achieve, and lighting technique is essential to cinematography. This lighting series will begin with summaries of different types of light, their strengths, pros and cons. Beginning with two of the most common types of light, tungsten and LED.
TUNGSTEN
The tungsten light is a staple of the film industry, and has been for more than 90 years. The light is a simple combination of parts: an incandescent lamp and a reflector, and in the case of fresnel fixtures, a fresnel lens.
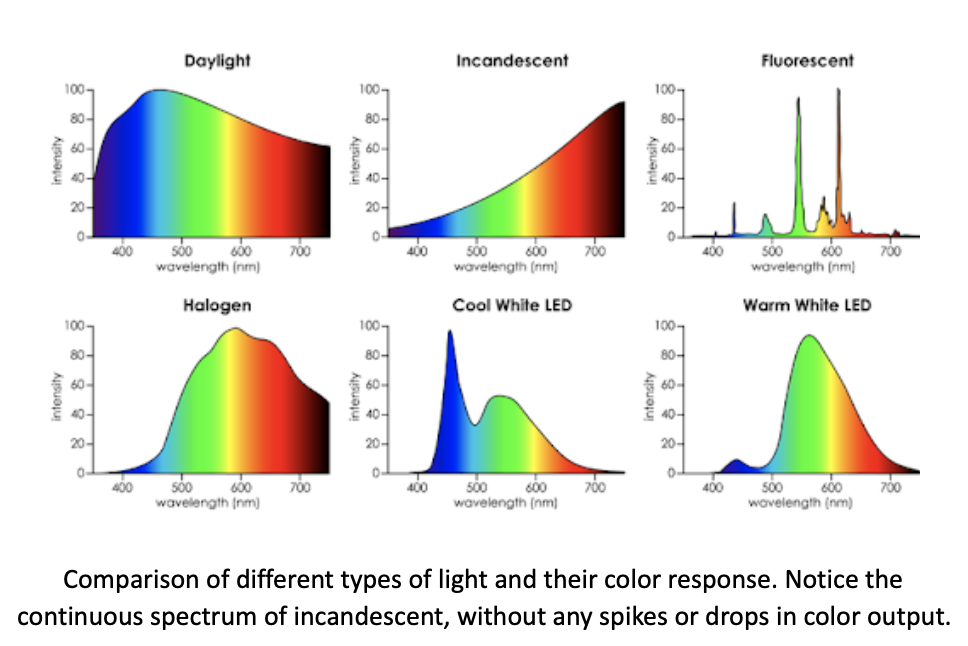
“Incandescent” means emitting light as a result of being heated. Developed throughout the 19th century and commercialized by Thomas Edison, the incandescent bulb produces light by sending an electric current through a tungsten wire (filament) and heating it to the point it glows. The light quality is heavily weighted in the red part of the visible spectrum with a balance of around 3200K color temperature. The color output response of heated tungsten is very even and continuous, which has led many cinematographers to prefer tungsten light over other sources. It is the purest form of artificial light and makes skin tones look beautiful.
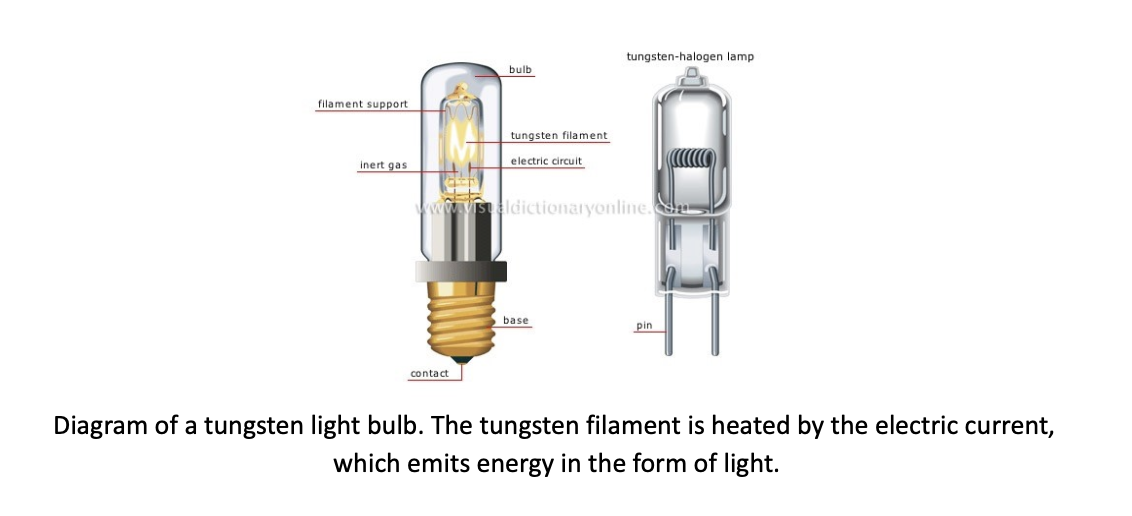
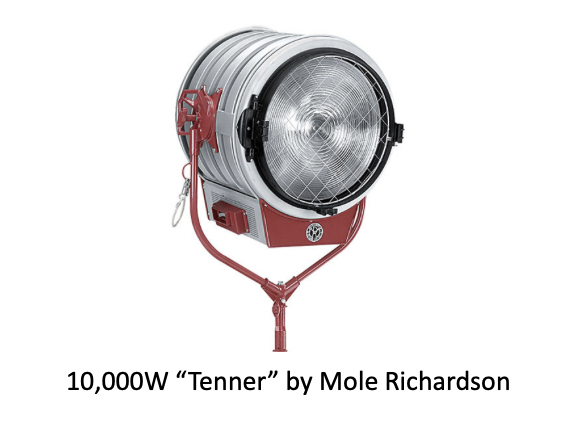
Mole-Richardson is the world-renowned leader in tungsten lamps. They make lights ranging from the 150W tungsten “inkie” to the 20,000W solarspot for a variety of situations. View their catalogue on their website. These lights are focusable, from “spot” to “flood” settings allowing for control of the beam.
Pros:
- Beautiful, continuous color spectrum, great skin tones
- Easily dimmable, flicker-free
- Huge range of fixtures that work perfectly together
- Controllable from spot to flood settings
- Affordable
Cons:
- Energy requirements - not much bang for your buck in terms of input and output
- Gets very hot, require gloves at all times
- 3200K color temperature, loses 1-2 stops of light to gel color to daylight balance
- Delicate and heavy
- Can’t be battery powered
- Cumbersome in comparison to LED, fluorescent
Tungsten lights have a wide range of uses, especially in controlled studio settings. Their greatest limitation is their power requirements in relation to their output, where 90% of the energy input is lost to heat. Especially on indie productions, tungsten lights are difficult because anything above a 2,000W light cannot be plugged into house power. By far the best thing about tungsten is the beautiful light that can’t be beaten by anything except daylight.
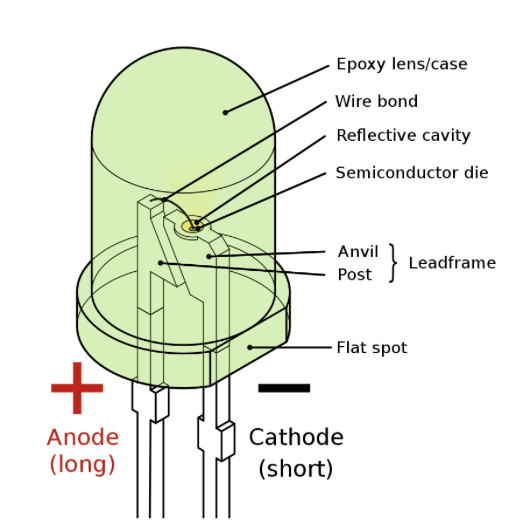
LED stands for light emitting diode. LEDs work through electroluminescence, which is the process of a material emitting light in response to the passage of an electric current. The diode is a semiconductor consisting of an electrically positive and negative side (“semiconductor die” in the diagram below). When a current flows through the diode, electrons on the negative side recombine with “holes” (atoms missing electrons) on the positive side in the p-n junction. When this recombination occurs, the electrons drop an energy level and in the process and release energy. The LED is composed of specific substances which allow this energy to be output in the form of light, and the specific amount of energy released dictates the light’s wavelength.
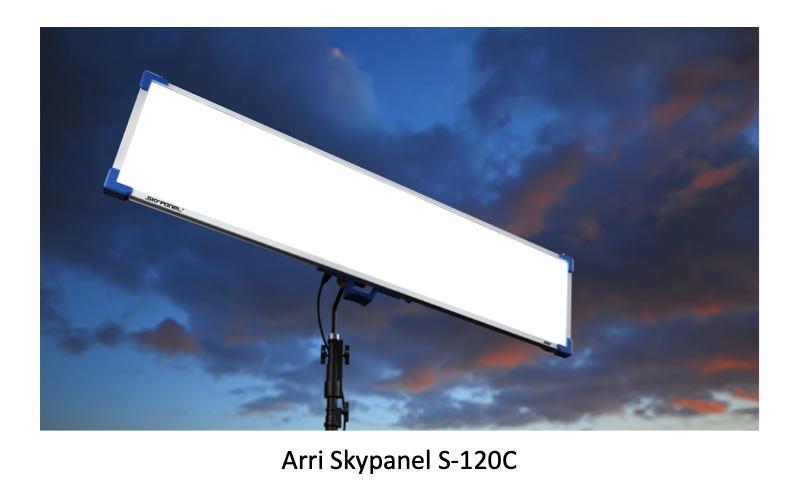
A single LED is very small, about half the size of a pencil eraser. A LED fixture has hundreds to thousands of LED units. Usually, LEDs are arranged in a panel structure, such as the Arri Skypanel shown above. This creates a naturally soft light that is very pleasant.
Most LED fixtures can change color temperature between 3200K and 5600K and some are RGB, which is extremely useful to have on set. In RGB LEDs, three LED emitters producing red, green and blue light are combined within one case and can produce a huge range of color.
LEDs come in a variety of shapes and sizes. They are very versatile lights. The most common type of LED is the panel arrangement, but LEDs can also be used in a fresnel light fixture to form a directional light that can be treated as a traditional lamp.
LEDs are extremely efficient - a 1600W LED puts out the same amount of light as a 10,000W tungsten (!!!). Unfortunately, they are also very expensive in comparison, especially for the highest quality units.
PROS:
- Does not use much energy, small LED units can run off battery power for hours
- Does not get hot, can be easily handled without need for gloves
- Easily dimmable
- RGB LEDs have a huge range of colors, most can change white color temp
- Robust, not near as delicate as a tungsten lamp or HMI
- Versatile, ease of use, great for run-and-gun and fast setup time
CONS:
- Color spectrum can lean towards green in cheaper units
- Light tends to look more “artificial” than traditional tungsten units, but this is getting much better with advances in color rendition
- Mixing LEDs from different companies can cause noticeable color issues
- Expensive!
